Reactor
 | |
| General | |
|---|---|
| Map Name | reactor |
| BSP Name | infra_c10_m2_reactor |
| Stalburg Map | reactor |
| Statistics | |
| Photo Spots | 11 |
| Corruption Spots | 6 |
| Repair Spots | 2 |
| Mistake Spots | 17 |
| Geocaches | 0 |
| Water Flow Meters | 0 |
| Camera Batteries | 3 |
| Flashlight Batteries | 0 |
| Connected Maps | |
| Previous Map | npp |
| Next Map | roof |
The very heart of the Black Rock Nuclear Power Plant. Stalburg's first constructed nuclear reactor is here, and repairing it is the final timed challenge of INFRA. All throughout the level are radiation level screens and flashing lights with various alarms, giving the player a sense of how much time they have left.
Story
Prior to the events of INFRA, a third reactor was being constructed for the powerplant, and delayed due to problems with the supporting concrete. Woefully understaffed, the engineers in-charge of maintaining the first two reactors note that there aren't enough workers to stop an accident if something goes wrong, and that the remote controls for the control rods keep getting locked.
When Mark arrives, the powerplant is on the verge of a meltdown. He finds and activates the second set of generators, then receives instructions from the manager to progress further into the reactor hall and take an elevator down to the pumps. At this point, Mark will have 5 minutes to find the missing components for the pumps and activate the reactor pool emergency fill. If he fails to repair them in time, the reactor will meltdown, and Mark will have to escape to the roof before the explosion.
If Mark succeeds, the 5 minute time limit will be reset, and Mark will need to return to the elevator to proceed underneath the reactor and disengage it.
Methods of Disengaging the Reactor
Depending on his previous actions during the game, Mark will have one or two ways to go about shutting down the reactor safely.
The first way is to follow the manager's instructions and walk right into the reactor's core chamber. There, Mark will have to push back all the control rods into the reactor, effectively slowing down then stopping the nuclear reaction entirely.
The alternate way is to locate a hidden door behind some crates, if Mark collected enough corruption evidence, he'll confront the manager about hiding something and reveal what he's seen in the bunker and Jeff Walter's videotape. The manager will acknowledge Mark seems to know a lot of things, and reveals Paul has some affiliation with S.N.W too. Paul apologies about the deception and gives Mark the code. Inside, Mark will report that the floodwater has locked the remote controls through an override. Disabling the override will restore the controls, allowing the manager to operate the rods remotely and shut down the reactor.
Mark and everyone rejoice as the threat of a meltdown is over. Paul tells Mark the helicopter is waiting for him on the roof.
Locations
S.N.W. Control Room
A hidden area that can control the entire facility's reactors. It was used by S.N.W. to secretly filch nuclear material from the powerplant to the bunker. Further inside are some offices, living quarters and a second control room. An audio log left by Sven Olsson confesses he was one of the leaders of the S.N.W. and recognized the project was doomed from the start when other leaders forced scientists into working against their will, using S.M.V. as a biological weapon and selling it to "the highest bidder" under the guise of protecting the country. A stained document left by Olsson in one of the offices also gives insight on the mysterious origin of S.M.V. The Document details that they "found something" during the construction of the bunker, and that a science team was formed to work on the "new project".
The door code for the control room is 0489, but you will not be able to use the code unless you've photographed ≥50% of all corruption evidence in Act 1, ≥90% of all corruption evidence in Act 2, and ≥50% of all corruption evidence in Act 3.
A map of Stalburg highlighting some areas of interest to S.N.W can also be located in this office.
Achievements
Hidden Achievements
| Icon | Name | Description |
|---|---|---|
 |
Behind the Scenes | Enter the S.N.W. control room. |
Mistake Targets
- If the second pump speed is set too high beyond the sufficient power, the other pump will malfunction and needs to be restarted, this will also incur a mistake penalty.
- Failing to stop the reactor from melting down will incur a mistake penalty and force ending 3.
Gallery
Documents
-
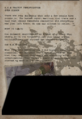
 Maintenance log for the reactor.
 -
 Investigation log by Sven Olsson on S.M.V.
 -
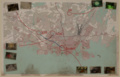 Map inside S.N.W control room.


Images
-
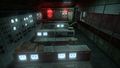 Far image that includes the entire SNW control room where the controls are located.
 -
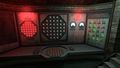 Close image of the reactor controls in the SNW control room.


Trivia
- A bucket of beer can be found at the bottom of the spent fuel rod cooling pool, presumably left there by the workers to keep the bottles chilled.
- There's an out-of-bounds easter egg inside the reactor of a teddy bear riding a bomb on top of an Osmo Olut sign, which may be a reference to Dr. Strangelove.
- The S.N.W. control room cannot be accessed without the meeting the corruption evidence prerequisites. When prompted about the door, the manager and Paul will tell Mark to not concern himself and stay focused on the task at hand.
- Several photos on the map inside the control room list various sites and photos of locations in Stalburg, Black Rock NPP, the bunker, the city gates are labeled as "NW", and photos of mushroom infested caverns as "RR".
- There is a jar of polonium-210 inside the control room, however unlike the other jars found, this one can be photographed, and interacting with it is lethal.
- On top of one of the shelves in the control room's bedroom, there is a model of a gun. This same gun can also be seen in one of the barracks in the bunker
| Map modules in INFRA campaign | ||
|---|---|---|
| Act I | Chapter 1: Preparations | office |
| Chapter 2: Just Another Day at Work | reserve1 • reserve2 • reserve3 | |
| Chapter 3: Forgotten World | tunnel1 • tunnel2 • tunnel3 • tunnel4 Easter eggs: hallway | |
| Chapter 4: Heavy Industry of the Past | furnace • tower | |
| Chapter 5: Fresh Water | watertreatment • sewer • sewer2 | |
| Act II | Chapter 6: Public Transport | sewer3 • metro • metroride • waterplant • minitrain • central |
| Chapter 7: Working Overtime | servicetunnel • skyscraper • bunker • stormdrain • cistern • powerstation | |
| Act III | Chapter 8: Late for a Meeting | powerstation2 • isle1 • isle2 • isle3 • business • business2 • officeblackout Easter eggs: wasteland |
| Chapter 9: To Save a City | rails • tenements • river • villa • field Easter eggs: city gates | |
| Chapter 10: Redemption | npp • reactor • roof | |
| Epilogue | ending 1 • ending 2 • ending 3 | |